TricksWorld 99: windows 7

Tab

How To Chat With Friends Through Command Prompt[MS-DOS]

How To Chat With Friends Through Command Prompt[MS-DOS]


Hello Friends,
Chatting Which is common thing nowadays,most of you chat with your friends through Facebook,Gmail,SMS,Whats APP etc..
But this is Something Different i mean to say is that you can chat with your friends through Command Prompt [MS-DOS].
All you need is just your friends IP address. You can get your Friends Ip address by telling him to visit this website whatismyipaddress.com

Steps To be Followed:
  • Get your Friends Ip Address. 
  • Open your Notepad and copy the below code & paste it as it is in notepad. 
@echo off
:A
Cls
echo MESSENGER
set /p n=User:
set /p m=Message:
net send %n% %m%
Pause
Goto A


  • Now save the notepad file as "Messenger.Bat".
  • Open Command Prompt [Press winkey + R and type cmd] 
  • Drag the above created file (.bat file) over to Command Prompt and just press 
        Enter.
How To Chat With Friends Through Command Prompt[MS-DOS]
  • Now type the IP Address of the your friends computer and press enter.

How To Chat With Friends Through Command Prompt[MS-DOS]

  • Now just type your message and press enter.
                      How To Chat With Friends Through Command Prompt[MS-DOS]
Chat with your friends in a new way and enjoy!!!

Enhanced by Zemanta

How To Create the Impossible "CON" "AUX" "NUL" Folders/ Folder without name


How To Create the Impossible "CON" "AUX" "NUL" Folders/ Folder without name

Hello everyone,
Most of you know this impossible thing in windows that is, you cannot create a folder called as CON or AUX or NUL in windows.Just try once
Create a new folder> rename it has CON> Finally you wont succeed :)

Here is a simple trick,theres no use from this post i just wanted to share this article so that everyone will come to know that there is also a way to create the folder called CON/AUX/NUL.

Follow these Simple Steps:
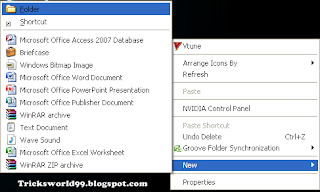
  • Right click on the desktop screen and create a new folder
                         How To Create the Impossible "CON" "AUX" "NUL" Folders/ Folder without name
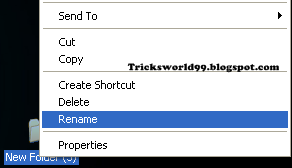
  • After creating the new folder right click on the new folder and click on rename
                                     
How To Create the Impossible "CON" "AUX" "NUL" Folders/ Folder without name
  • Now do this carefully  Press ALT + 255 (type 255 one after the other ) (type the numbers located on the num pad - right side of keyboard)
  • Leave the ALT button and now you will get the folder as shown below
                                             How To Create the Impossible "CON" "AUX" "NUL" Folders/ Folder without name
  • Type CON/AUX/NUL  or just leave it blank
                        How To Create the Impossible "CON" "AUX" "NUL" Folders/ Folder without name How To Create the Impossible "CON" "AUX" "NUL" Folders/ Folder without name      
So now you have suceeded in creating the folder with name as Con / Aux / Nul and even a folder without name.
Enjoy !!!!!!!!!  

How to Fix USB Device Not Recognized in Windows


How to Fix USB Device Not Recognized in Windows
Hi Everyone,
In this Post am going to explain how to get rid of the usb device not recognised error.
 Most of you will be getting this error whenever you try to plugin a Pendrive,USB mouse,External devices,USB keyboard.
Even i Faced the same problem 3 days back and got it rectified so i wanted to convert my problem and the solution that i got it to a Article which i have presented here!!!!! 
I thought that there is a problem with the port so check it out i connected my mobile but the mobile was charging and there was no problem with the port.
How to Fix USB Device Not Recognized in Windows

So i reinstalled all my drivers i thought it would fix my problem but it didnt. I was frustrated.
I Searched many articles online and found a solution to this frustrating error.

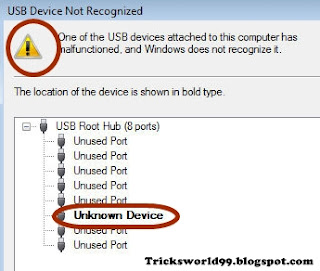
  • When you get these kind of error just go to  Device Manager and you can see that the device is shown as an Unknown Device as i have shown below.
How to Fix USB Device Not Recognized in Windows


  • You may laugh at this solution :D :D because there is no involvement of drivers,installation etc.
  • The simple awsome solution is Just UNPLUG YOUR COMPUTER/PC FROM THE POWER SUPPLY
Note: This doesnt mean just turning off your PC because modern PC's doesnt really turn off when you press the power button because the still motherboard gets power to it.
  • Didnt Understand still??? 
Motherboard is the place where all the hardware of the Pc is connected to it even the  USB ports.Most of the times the motherboard should be rebooted because all your USB ports suddenly stops working. 
The microprocessor located on the motherboard will reload the drivers.
So this will bring your usb ports to normal condition.
All you need to do is:
  • Just turn off your PC with the Shut Down option or just by pressing the power button
  • UNPLUG the connection from the wall outlet. 
  • After 2-3 mins just plug it back.
I got it fixed like this!!!Hope this works for you too!!!!!!!!!!
Also Read:
Enhanced by Zemanta

How to make Windows 7 Genuine in Simple Steps

 How to make Windows 7 Genuine in Simple Steps

Hello Friends,
Windows 7 was the great hit after windows xp, but sometimes you would face problem like a popup window/notification showing that your windows is not genuine  so please activate it.
This will be irritating so here i have a simple step to make the windows geniune in other words to stop the notifications

Also Read: Top 5 Softwares To Recover Corrupted/Damaged Files 
                 New Year And Christmas Giveaway For You People
Steps:
  • Press the Start Button and open the run dialog box or directly press windows key + R
  • now type cmd in the run box
  • It will open a new window/Command Prompt
  • Now type   SLMGR -REARM  and Hit Enter
  • Wait For 15-20 seconds and you will get a message as shown below
How to make Windows 7 Genuine in Simple Steps
 Now your Windows is geniune :)


How to Format USB Drives to delete Viruses Permanently

How to Format USB Drives to delete Viruses Permanently

Hello Everyone,

You will be frustrated of viruses which almost corrupts your files. But you people will be using antivirus to scan the most harmful viruses and remove them.
But you know what????
When you transfer data through USB/PenDrives it may contain viruses and you will be able to format the USB drive but some of the viruses do remain in drive even though you format it.
So here I will give you a solution which removes virus permanently from your pen drive.


Also Read:Top 5 Softwares To Recover Corrupted/Damaged Files


Steps To Be Followed:

  • Plugin the Pendrive which needs to be formatted
  • Now Just Find the drive letter of  the inserted pen drive
How to Format USB Drives to delete Viruses Permanently

  •  Click on Start Button and Then click on Run
How to Format USB Drives to delete Viruses Permanently

  • In the Run Prompt Type cmd and then Hit Enter
  • You can see a command Prompt Appeared and In this window Type just as shown below
                               format "Pen drive Letter:"
                    ex: if your pendrive letter is K then type  Format k:


How to Format USB Drives to delete Viruses Permanently
  • Hit the  Enter button twice and now the cmd prompt will verify the pendrive file system
  • And Now the command prompt will ask to enter drive name(Pendrive name) just type your own name and HIT enter
  Now Your Pendrive Is Completely Formatted :)
Enhanced by Zemanta

Best Downloader Softwares for Windows 2012 (Free Download)


downloader is a computer program dedicated to the task of downloading (and sometimes uploading) possibly unrelated stand-alone files from (and sometimes to) the Internet for storage. Some download managers can also be used to accelerate download speeds by downloading from multiple sources at once. Although web browsers may have download managers incorporated as a feature, they are differentiated by the fact that they do not prioritize accurate, complete and unbroken downloads of information.


Click on the download link below you will be redirected to a page after 5 seconds press  SKIP AD on right top corner and download

utorrent imageuTorrent
Speedy, efficient, and free. The most popular BitTorrent client.

Deluge imageDeluge
An awesome but unappreciated cross-platform BitTorrent client.

ytdownload imageYouTube Downloader HD
Downloads YouTube videos with just a few clicks of the mouse button.

peerblock imagePeerBlock
Control/block your PC’s communication with ad or spyware servers. Secures P2P activities.

flashget imageFlashGet
A download manager that supports HTTP, FTP and BitTorrent protocols amongst others.

mipony imageMiPONY
A download manager designed to facilitate downloading from file lockers like Rapidshare.

freemakedownloader imageFreemake Video Downloader
Download and keep embedded videos from thousands of websites, supports Facebook as well as YouTube and audio extraction.

freedownloadmanager imageFree Download Manager
Open source download accelerator and manager. Increase download speeds and resume broken downloads.

jdownloader imageJdownloader
The most popular download manager. Quickly and efficiently download files from sites such as Rapidshare, Megaupload and many others.

How To Create A Partition In Windows 7

How To Create A Partition In Windows 7

Hello Everyone,
Most of you know how to make a partition in windows 7 but also some of 
you dont know how to do it so create a partition just follow these steps
  • Go to Start -right click on My Computer and then click Manage
  • Now You will see a Computer Management window/Screen. 
  • Now that storage space is growing and now click on Disk Management
  • Ok just few more steps, Now select a drive to partition. For ex  drive D: When you select the partition right-click on the menu and then select Shrink Volume:
  • You will see a window which says the hard disk size and total amount which is available for contraction 
  • You can now type the amount you want to reduce (this will be the size of your new partition) Depending on the size you have selected to shrink it might take some time.
  • After that Select the partition which is created and right click on it. Then select New Simple Volume.  Follow the wizard that appears, and fill the partition size. After assigning a drive letter, you can do this by taking one of your choice. On the Formats page, make sure that NTFS is selected, then enter a name for the reader that is "anything" and click Next then Finish. 
                     Also Read: Top 5 Softwares To Recover Corrupted/Damaged Files

How to Remove Windows Genuine Advantage error (100 % working)

Hiiii Guys most of  you would have faced the problem of annoying windows geniune advantage notifications.
so i will teach u how to remove those annoying messages.


Step 1: Click on the "Start" button and then the "Run" icon.

Step 2: Type "regedit" without the quotation marks in the "Run" text field and click "OK." Your register editor program will now display.

Step 3: Navigate to the following registry file: "My Computer\HKEY_LOCAL_MACHINE\SOFTWARE\Microsoft\Windows NT\CurrentVersion\Winlogon\Notify." You can find that key by first clicking on "My Computer," then "HKEY_LOCAL_MACHINE," then the "Software" folder, followed by the "Microsoft" folder, which brings you to the "Windows NT" folder, then the "Current Version" folder, followed by "WinLogon" and finally the "Notify" folder.

Step 4: Find the "WgaLogon" folder inside the "Notify" folder and right-click on it. Choose the "Delete" option and left-click on it. You have now removed the program files from the registry.

Step 5: Restart your computer for the changes to take effect. The program should now be removed from your registry.


    • Note: I have shown the procedure in video also which is below.. pls follow it


      Warnings:

      The steps above will not delete the entire Windows Genuine Advantage program; it will, however, remove the program from your registry, which will stop the program from functioning and inundating you with those annoying pop-up reminders.

      Do not delete the wrong files from your registry, as this can lead to catastrophic system failures in some cases. If you are not sure about performing the process listed above, you may want to contact a PC support company for further assistance.


How To Block a Website For Specific Time Period in Windows:FocalFilter


Website is a collection of interconnected webpages containing content like audio, video, text, images, songs, movies etc. A webpage is a document written in a plain text intermixed with format of Hypertext Mark Up language(HTML).Webpages of the Website can usually be retrieved from a simple Uniform Resource Locator(URL)known as Web address. Website is stored on the webserver known as HTTP server.

There are too many reason to block websites, one and the most common reason is that parents want to prevent their children from accessing harmful websites such as porn or to prevent them from spending their precious time on Social Networking Websites. Another reason is to prevent access to restricted content like hacking,youtube etc for specific time.

Note:-To run the FocalFilter your computer must have Microsoft’s .NET Framework version 4 installed.
You can also block access to websites manually but the software called FocalFilter saves you from the trouble of changing settings manually and blocks the websites automatically for a particular time span.You just have to set the website name and time span for which you want to block the access. This software is for the windows operating system and after the completion of specified time access to blocked websites is revoked. 

How To Block a Website For  Specific Time Period in Windows

  • Downlaod and install the FocalFilter From Here.
  • Run FocalFilter, choose Edit my Site List tab and new window will open.
How To Block a Website For  Specific Time Period in Window

  • Write the URL of the websites which you want to block , click  Save tab.
How To Block a Website For  Specific Time Period in Window


  • Move the cursor to the drop down list next to label Block for then the list will show time ranging minimum 5 minutes to maximum 12 hours, Select the desired time period from the list.
How To Block a Website For  Specific Time Period in Window

  • Then, Choose Block my Site List to block the list of Websites.

  • After the completion of time period, a window popup. Click on the close button to unblock the websites Blocked by FocalFilter.
  • To extend the block time click on the Block again
How To Block a Website For  Specific Time Period in Window


How to Unblock the Websites blocked by FocalFilter

  • To unblock Websites blocked by FocalFilter before the specific time period, Restart your computer.
  •  After restart you will be greeted with FocalFilter Popup window.Click on OK button.
How To Block a Website For  Specific Time Period in Window

Note:-FocalFilter cannot block websites if you are using Kaspersky Internet Security or Avira Antivirus.

How to add Uninstall Option In Right Click Context Menu

If you need to uninstall a program then you have to navigate to Control Panel,then to Uninstall a program.
This is very time consuming process for those who frequently test softwares.Now you can add Uninstall option in your right click menu with a freeware utility Menu Uninstaller.
Using this you can uninstall any program with a single right click on its shortcut.It is compatible with windows xp,Vista and windows 7.
free menu uninstaller


  1. Download Menu Uninstaller.
  2. Click on the setup to install it in your PC.Installation process is fairly simple.
  3. Now Uninstall option will available in right click menu.
To remove any program simply right click on its shortcut and select Uninstall Option

How to transform windows to Macintosh

Get Lion Transformation pack 1.0 which transforms your Windows OS to Apple's Macintosh OS.
It is a nice theme check out some of the screen shots here : -


Click download button to download the theme.
 

How to install Window 7 using USB drive


"Think  Smart"


Installing windows 7 using USB drive


What are basic requirements ?
-----Windows 7 DVD
-----And a USB drive having minimum capacity of 4GB.


 What  are advantages if we install window 7 using flash drive ?

----First overall speed of the installation willl increase significantly.
----Carrying USB is more easy and convienient than DVD.
----It also become possible to install windows 7 on  that systems which are not having  DVD drives    such as Net book..


Steps of installing windows 7 using USB drive.
---- Insert USB
---- Run the command prompt as administrator. (Type cmd in start and right click on cmd and click on "run as administrator".)
----In the command prompt type the following command

     -DISKPART

 A new window will appear and execute the following commands in that new window.
 -LIST DISK
-SELECT DISK 1
-CLEAN
-CREATE PARTITION PRIMARY
-SELECT PARTITION 1
-ACTIVE
-FORMAT FS=NTFS
  (This process may take few seconds)
-ASSIGN
-EXIT
Do not  close the command prompt. Minimize it.
----Insert window 7 DVD .
----Maximize cmd and execute the following commands
-   N: CD BOOT   (hit enter Here "N" is my DVD drive letter write your one's here)
-   CD BOOT
-   BOOTSECT.EXE/NT60 O:  (Here "O" is my USB drive letter)
After entering the command this messages appear
                          Your USB device is ready for the boot. Now copy the content of DVD to the USB.
The thing you left to do is to enabling the USB boot options in the BIOS from CD-ROM or HDD.
Enjoy installing windows from USB . If any problem leave it in the comment section.